
In this post, I’m going to walk you through this super cute and easy project for creating a DIY Spring Wreath for your front door.
After making this wreath, it will take away that intimidation factor and get you into the DIY home decor kinda mood!
Front Door DIY Spring Wreath
If you’re like me and you dream of creating something pretty to adorn your front porch just in time for the spring season, it can be intimidating.
But, once those cold winter months being transitioning to warmer weather, the early spring fever really starts to kick in!
Because of this, I decided that a great way to get organized is to first find the materials to make my DIY Spring Wreath.
That way it will minimize your chances of going out on a wild goose chase looking for your materials.
And to get lots and lots of inspiration, I went directly to Pinterest.
You would not believe the plethora of ways you can create a floral wreath.
Types of Wreath Forms
First, there’s a huge variety of wreath forms you can use:
- Foam
- Grapevine Wreath Form
- Twig Wreaths
- Wagon Wheel
- Wire Wreath Form
- Embroidery Hoop
- Hula Hoop
- Metal
- Cardboard
- Straw
- Wooden
- Pine cone
- Even pool noodles and garden hoses!
Decorating the Base of Your Front Door Wreath
Then there’s the method of how you decorate the base of your very own unique wreath:
- Burlap wrapped
- Yarn wrapped
- Deco mesh
- Crochet flowers
- Felt flowers
- Wooden flowers
- Moss covered
- Yarn pom poms
- Twine
- Raffia
- Ornaments
- Coffee Filter Wreaths
- The list goes on and on.
So I was a little bit overwhelmed when I walked into my local A.C. Moore.
All I knew was that I wanted to make a burlap ribbon wrapped foam wreath, add pretty flowers to it and adorn it with pretty ribbon.
Step-By-Step Tutorial For A DIY Spring Wreath
Here are the steps you’ll take to make your very own colorful spring wreath.
Step 1: Gather Your Materials & Supplies
Unfortunately, you may not find all of the materials you want for your front door wreath all in one place.
For example, I ended up going to 3 different local craft stores, A.C. Moore, JoAnn Fabrics, and Michaels to get what I was looking for.
In addition, any craft store (like Hobby Lobby) or dollar store (like Dollar Tree) will typically have a lot, if not all of the materials you’re looking for.
OR you can purchase most of what I used for your beautiful wreath from Amazon.
My Materials List:
Keep in mind you’re going to have leftover materials that you can save for future projects or another lovely wreath!
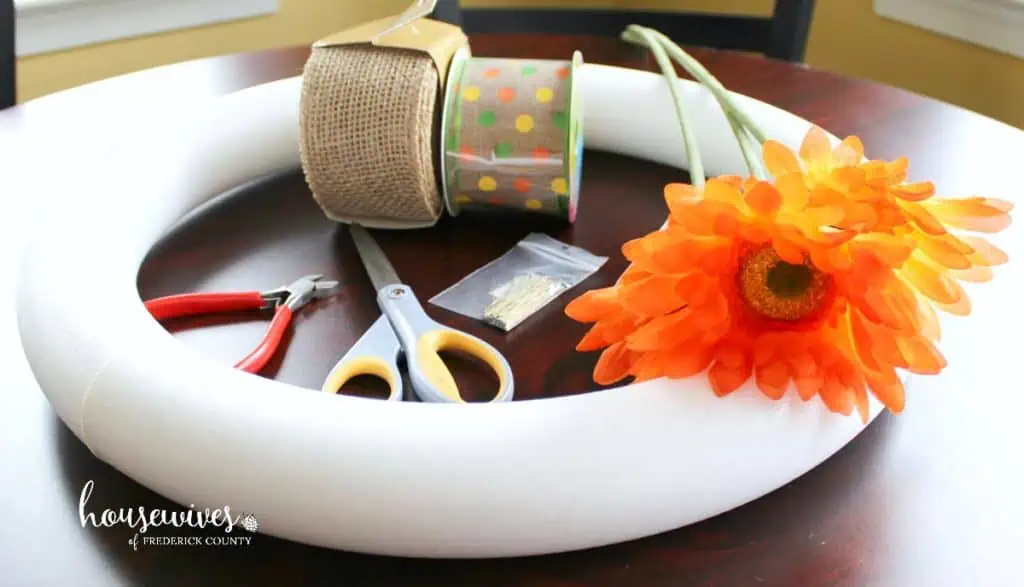
- 18″ white styrofoam extruded wreath – (Got mine at A.C. Moore) And there’s one just like it from Hobby Lobby.
- 2 1/2″ by 10 yard burlap ribbon – (Got mine at A.C. Moore) You can get this on Amazon.
- Green florist wire (24 gauge, 1/4 lb) – Got mine at JoAnn
- Hot Glue Gun & Glue Sticks – You can buy one, glue sticks included, from Amazon.
- Wire cutters – Check your hubby’s toolbox or you can get them on Amazon.
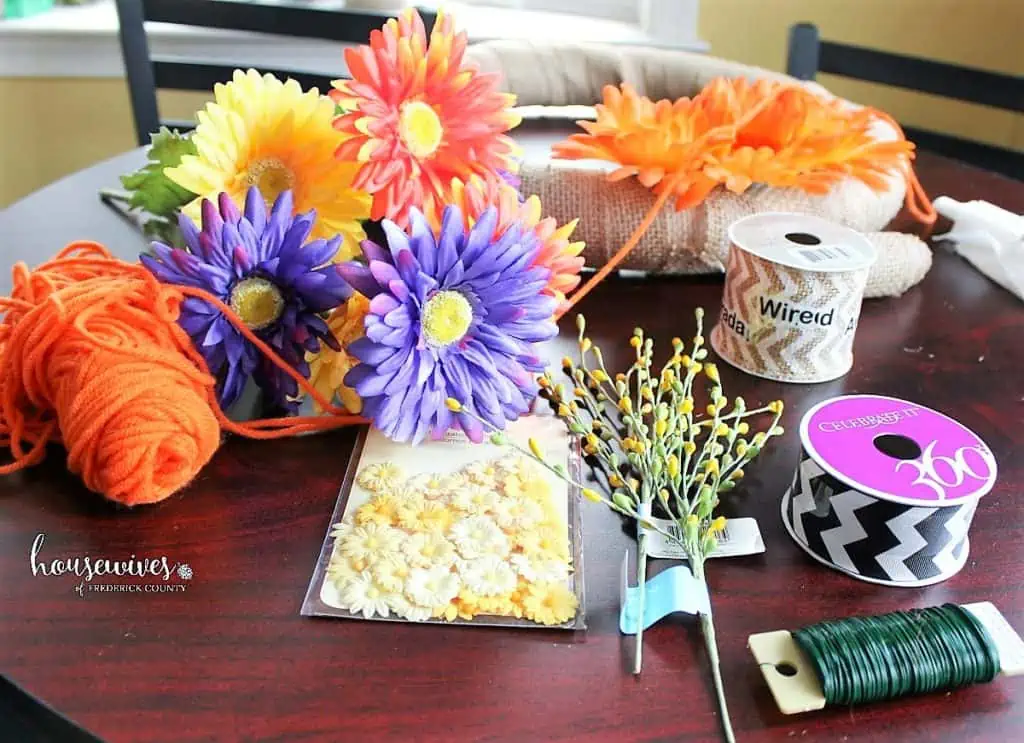
- Artificial flowers – Got my faux flowers at A.C. Moore & JoAnn OR get 12 of them on Amazon in different colors. By the way, I wouldn’t recommend fresh flowers unless they are dried, and even then, they’re very delicate and can make a mess.
- Faux Succulents – To create a succulent wreath, substitute faux succulents for the faux flowers.
- Craft & Rug Yarn, 43 yards – Got mine at JoAnn OR find a pack of 8 different colors (65 yards each) on Amazon. If you know you’ll be making more than one wreath, this is a deal.
- Sprig Picks – Got my berry sprig picks at JoAnn. Couldn’t find them on Amazon except in bulk. You can also get sprig picks with green leaves or other fun spring things like Easter eggs.
- Wired white chevron burlap ribbon, 2 1/2″ by 3 yards – Got mine at Michaels OR you can get it on Amazon.
Initially, I bought a Styrofoam wreath, 3 spring flowers (artificial), and a spool of polka dot ribbon.
I liked how the bright colors of the polka dots in the ribbon matched the colors in the faux florals.
How to Make Your Own U Pins
I hadn’t totally prepared myself with how to attach the burlap ribbon to the wreath form.
Turns out you need floral wire cut into 2 inch pieces and curved into a ‘U’ shape in order to push through the burlap and attach it to the foam form.
Or you can buy the pins already made.
I didn’t have floral wire, but because I’m pretty resourceful, I used brass head pins, from my previous life as a jewelry designer, and snipped the heads off with my handy jewelry wire cutters.

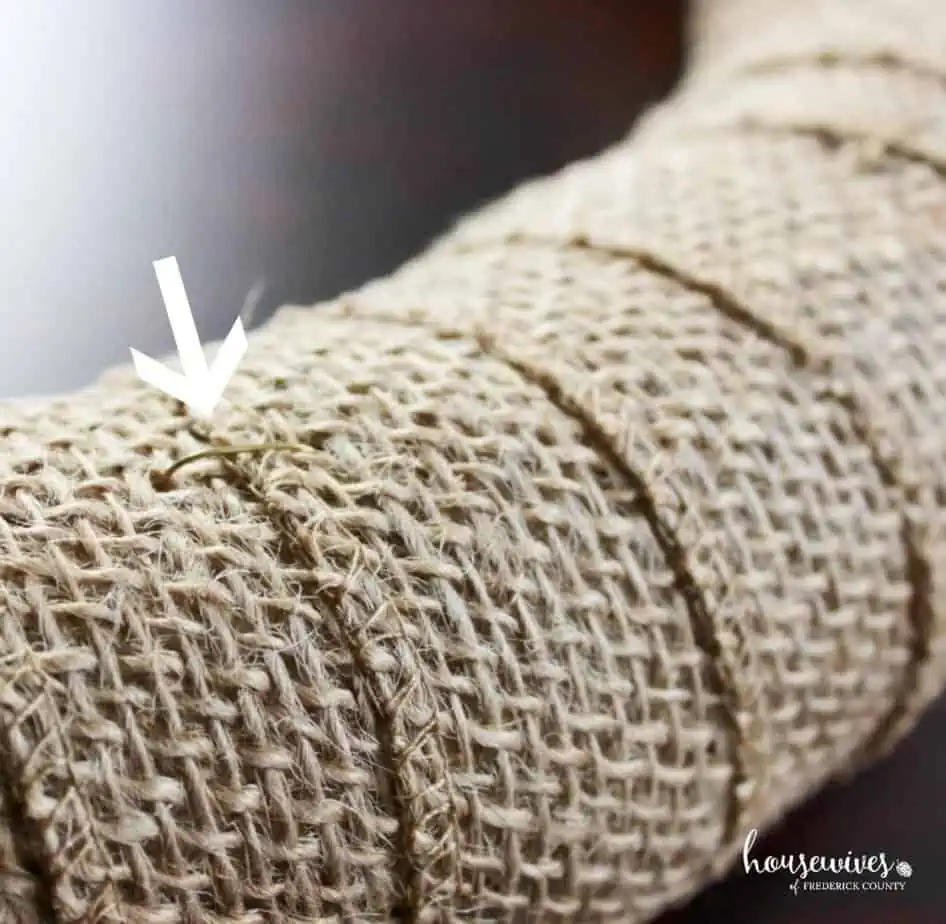
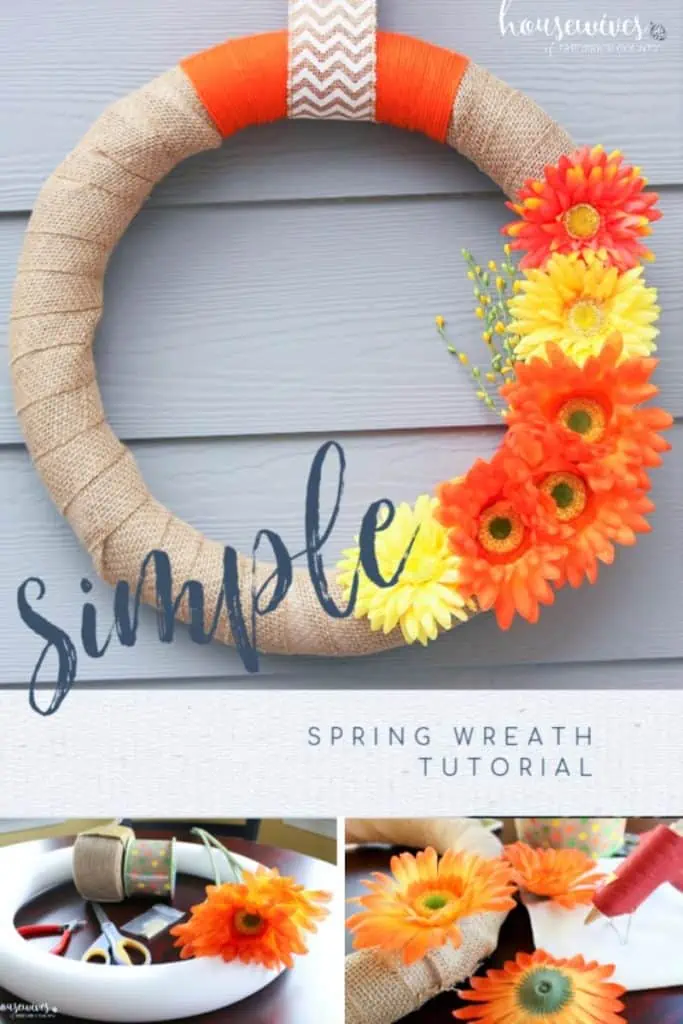
Step 2: Front Door Wreath: Attach Burlap Ribbon to Styrofoam Wreath
Wrap the burlap ribbon snugly around your Styrofoam wreath.
With your first wrap, secure a ‘U’ pin to the back of the wreath.
Keep wrapping and use your pins to secure the back side of the wreath every 3 to 4 wraps.
See below picture.

Here’s what it looks like completely wrapped with the burlap ribbon:
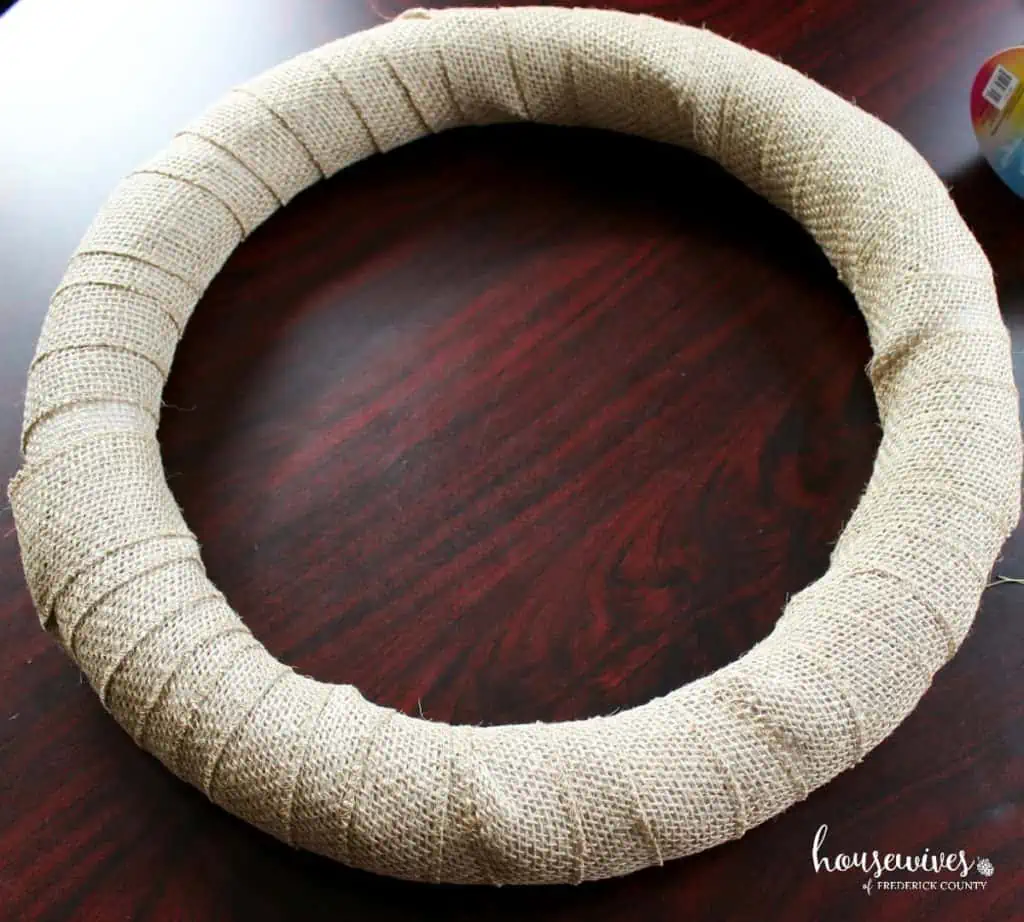
Here’s a close-up of what the pins look like pushed through the burlap to secure them to the foam.
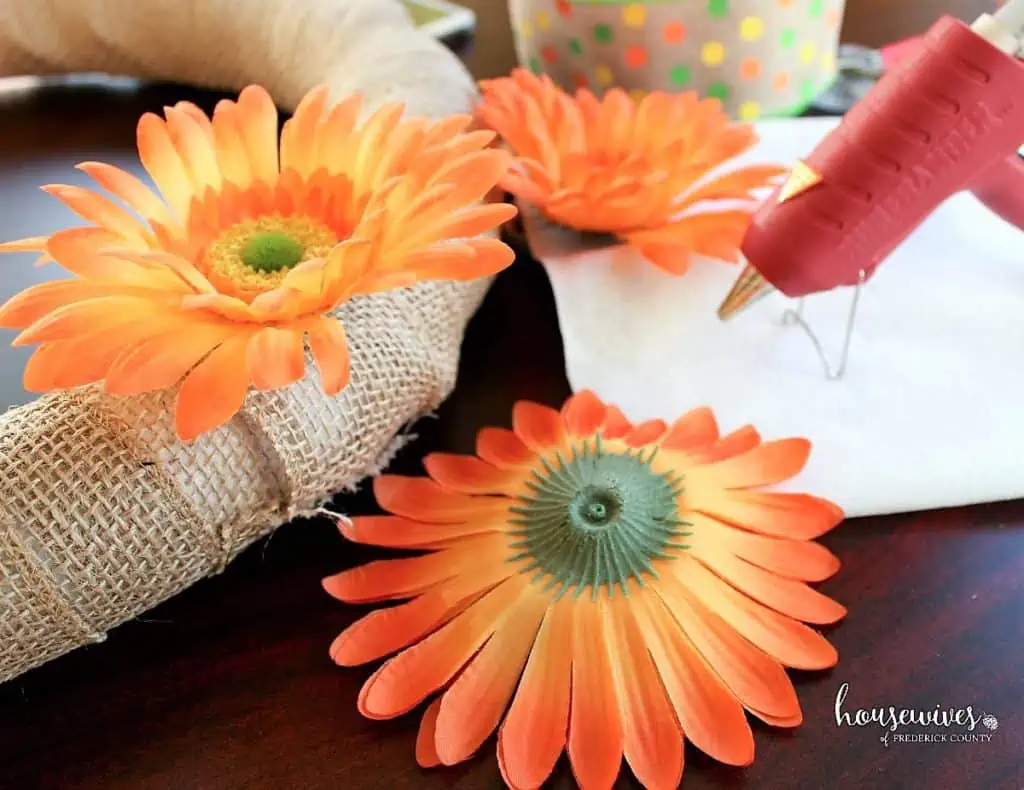
Step 3: Front Door Wreath: Begin Decorating
After your Styrofoam wreath is wrapped with the burlap ribbon, then you can start decorating.
Make sure you have a plan before you begin using your glue gun because once your decorations are glued, there’s no changing up the design.
Using my wire cutters, I cut the stems off the colorful flowers all the way to the base of the back of each flower.
I then added hot glue to the center of the back of the flower and pressed it onto my wreath.

I originally bought only 3 artificial flowers.
Once they were glued to my wreath, I realized I needed more to make it look complete.
Plus, I really didn’t like the polka dot ribbon on the wreath. It just didn’t ‘pop’ enough.
So, off to the store I went!
This time I went to Jo-Ann Fabrics.
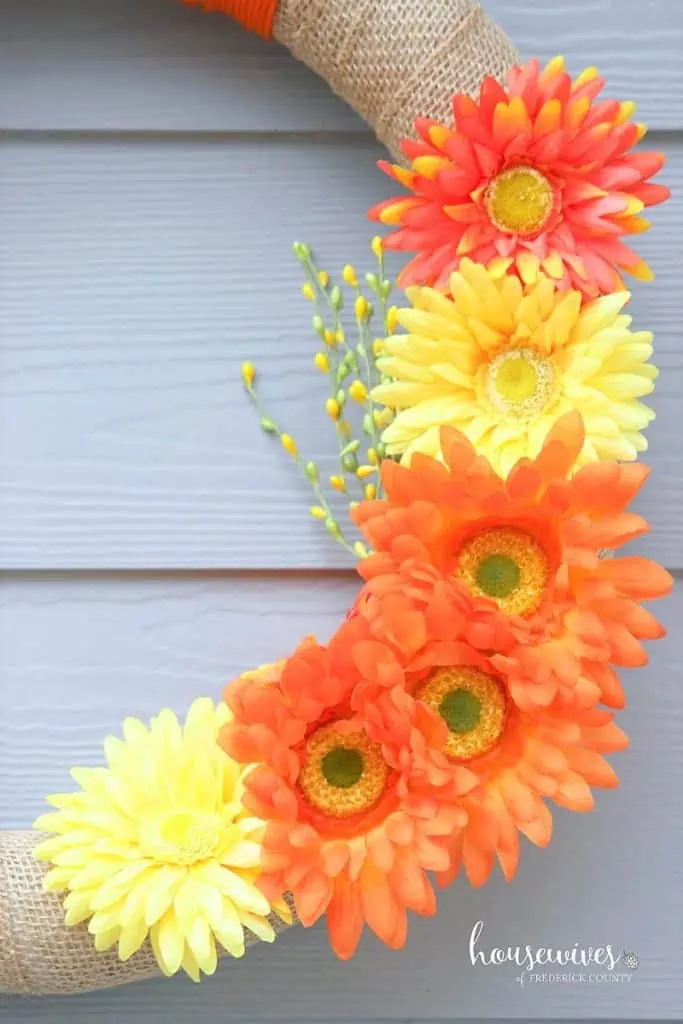
I found more flowers and decided I wanted some yellow flowers mixed in with the orange flowers.
The purple flowers were part of the bunch of flowers, but I decided not to use them.
Also, I wanted some sort of berry sprig to mix it up a little with the flowers.
So, I bought 2 but only used one ‘pick’ of the yellow berries.
Then, I glued the ‘pick’ part to the inside edge of the wreath.
After that, I glued a flower over the pick for it to look nicer.
I thought the package of yellow daisy buttons was super cute, but I ended up not using them for this project.
The chevron ribbon was so pretty, so I bought 2 colors, but went with the burlap and white.
Step 4: Front Door Wreath: Wrap Yarn Around Wreath
I decided to use some orange craft yarn to break up the monotony of the beige burlap.
I really love the look of a fully yarn wrapped wreath (maybe my next project?).
So I decided to add a block of wrapped yarn to the top of my wreath.
This can be time consuming.
Pull up a chair and start wrapping.
Use your glue gun to attach the first piece of yarn to the back of the wreath in the spot you want the yarn to start (I used a sharpie to mark the back of the wreath where I wanted the yarn to start and end).
Then when you’re finished wrapping the yarn, cut the end and use your glue gun to glue the end.
Step 5: Cut Chevron Ribbon to Desired Length & Wrap Around Top of Wreath
I cut mine to be about 36″ long (give or take) and wrapped it around the top of the wreath.
I glued the edges together and used a nail through the center to attach it to the wall.
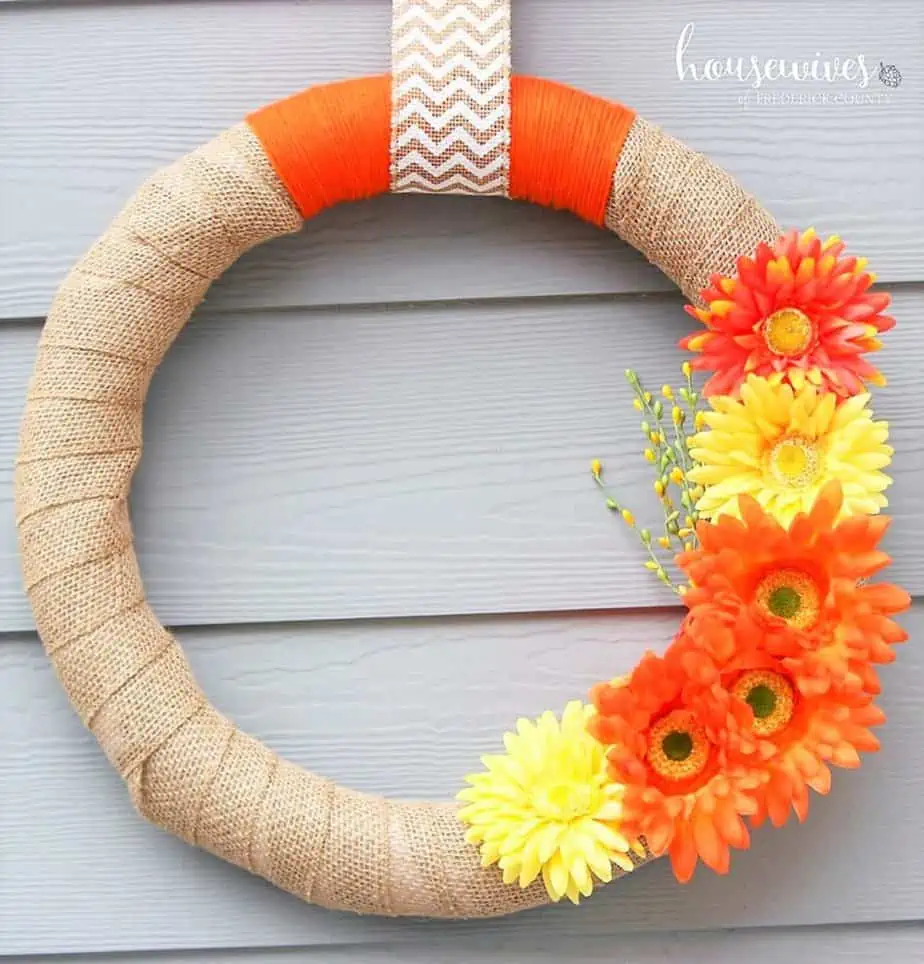
HERE is my new spring wreath!
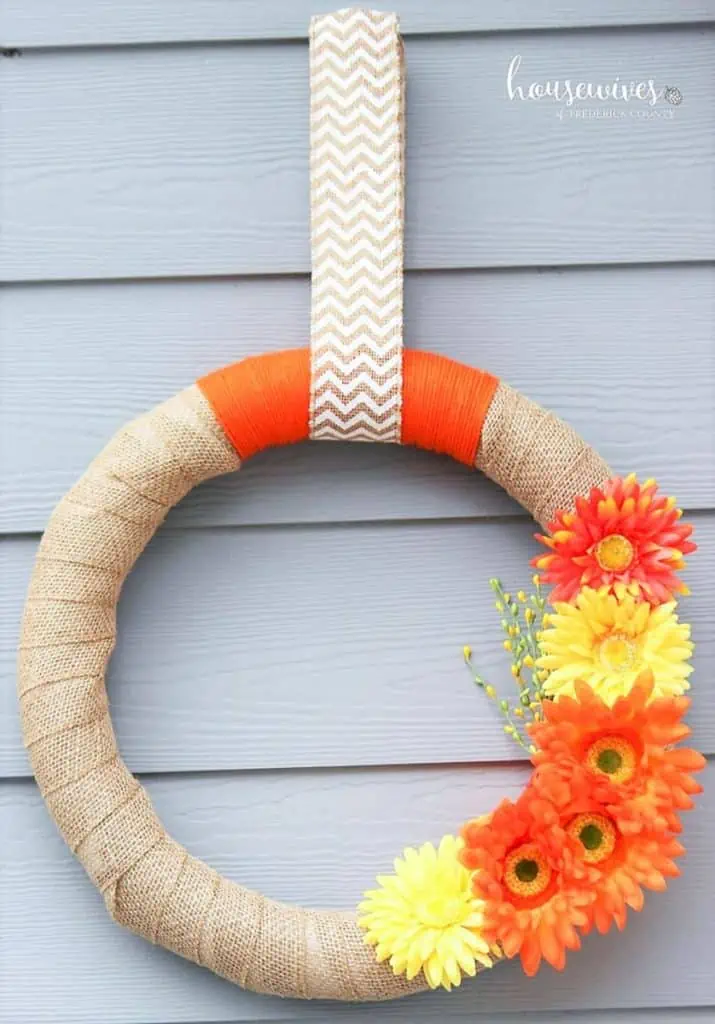
I’m super happy with the way it turned out.
I absolutely love the pop of color, especially orange!
However, I also didn’t want something too busy and detailed.
This turned out to be the perfect wreath for me!
Thanks to Terri for giving me constructive feedback throughout the process.
I’ve now gotten over my feelings of intimidation and see more DIY wreaths in my future!
So Many Ways You Can Make A Front Door Wreath
There are literally an unlimited variety of ways you can create a wreath.
Feel free to use my simple wreath design, using your favorite colors, flowers and ribbon.
What DIY spring projects do you gravitate to?
We’d love to hear about it in the comments!
For more easy DIY projects, click on over to:
DIY Grapefruit Slice Doormat Tutorial
Pretty DIY Teacup Succulent Planters

- The Best Donuts in Frederick MD - June 5, 2024
- 23 Specialty Shopping Boutiques in Frederick, MD - May 10, 2024
- 30 of the Most Iconic Maryland Food and Drink - March 9, 2024
Dear Pam: I bookmarked your “How to Make a Front Door Wreath” page because I want to make a burlap wrapped foam wreath. Your directions are very simple and the photos will be very helpful. I have just ordered what I hope is the last of the materials so I can get started in a week or so. The hardest part for me is deciding which tools, flowers and embellishments I will need. Seeing a pretty ribbon or flower often changes my design idea. Fingers are crossed that I don’t spend too much or choose too little, which will result in another trip to Michael’s or more browsing on Amazon.com. Lastly, thank you for the instructions.
Hi Dorothy, You are very welcome! I loved making this project. I hope you enjoy it too!