Last updated on January 22nd, 2024
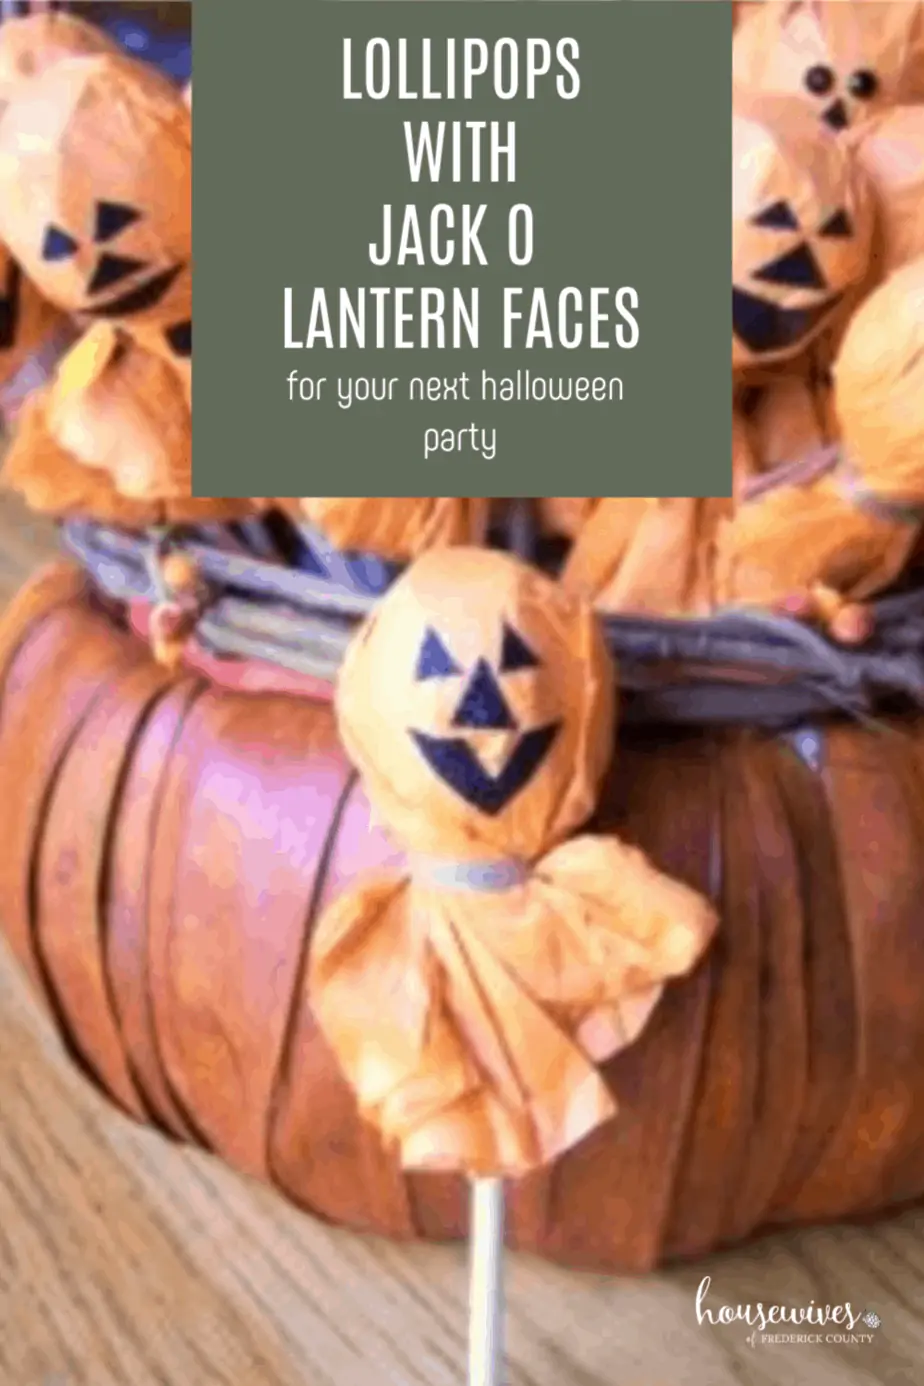
This DIY project for lollipops with Jack O Lantern faces will put a smile on everybody’s faces at your next Halloween party.
Using Tootsie Roll Pops and orange tissue paper, you can create a basket full of howling fun treats!
Lollipops With Jack O Lantern Faces
A few years ago I found this really cute Jack O Lantern Lollipops craft idea from the Better Homes & Gardens website.
I thought it would be perfect to bring to my son’s 1st grade Halloween party at school.
The Better Homes & Gardens instructions were not very detailed, but I decided it looked easy enough.
Materials for Jack O Lantern Faces
Here is what I used for this project:
- 1 1/2 bags Tootsie Pops
- 3 small packages orange tissue paper
- Decorative Halloween themed ribbon
- Pumpkin shaped basket or container
- FloraCraft Dry Foam
- Round black embellishments or stickers
- Black Glitter-on-a-roll tape
- OR instead of the embellishments and glitter tape, just get these Jack O Lantern stickers

Lollipops with Jack O Lantern Faces Directions
Here are the directions according to bhg.com:
“Tissue-paper circles embellished with punched shapes turn store-bought suckers into merry jack-o’-lanterns.”
These directions didn’t give me much to go by, but I figured it looked easy enough.
Well, it ended up taking a lot longer than I thought it would.
So, I will give the directions as to how I completed this project.
Then I am going to give you some shortcuts so it won’t take you as long as it took me.
Here is what I did:
- Open up the tissue paper and, using 3 sheets at a time, trace a 7″ diameter bread plate 6 times.
- Cut the circles out of the tissue paper.
- Place 1 circle (of 3 sheets of tissue paper) on the table and set the lollipop upside down in the center of the tissue paper.
- Wrap the tissue paper around the lollipop and twist firmly around the base.
- Cut your ribbon in 6″ strips.
- Wrap & tie a 6″ strip of ribbon around the base of the tissue covered lollipop. If you want to tie the ribbon in a bow, you’ll need it cut into 8″ strips.
- Embellish each lollipop with the round black embellishments to use as eyes or a mouth.
- Use the black glitter-on-a-roll to cut out shapes for the nose, eyes, and/or mouth.
- Place the dry foam in your basket and stick your lollipops in the foam to arrange them.

How to Make Them in Less Time
I have to say this turned out super cute.
But it took me hours to do.
So here are some ideas to cut your project time hopefully in half:
- Shop ahead of time and online!! If I had planned ahead, I could have gotten a lot of these items online without having to go on a wild goose chase trying to find everything.
- Find PRE-CUT orange colored tissue paper 7″ diameter circles. I have yet to find them, so if you find them, please tell me where you found them!
- Use hole punches with triangular, round, and other shapes to use with the glitter-on-a-tape instead of having to cut the shapes yourself.
- Better yet, find black pre-cut adhesive foam shapes (triangles, circles, stars, etc) to decorate your pumpkins.
- Even easier: Use the jack o lantern stickers I listed in the materials list above. I’ve also seen people just use a simple black sharpie to draw the faces on the tissue paper. This is a cheaper route, but might not look as cute.
- If you run out of ribbon, you can use raffia. Raffia goes a long way, is cheaper than decorative ribbon, and the kids are just going to tear them open anyway.
Please comment below if you know ways of making this project a little bit easier and quicker.

The Finished Project
When my husband came home from work and saw the completed project, he said ‘Whoa! Cool!’.
He’s not a very expressive type of guy, so I was happy to hear that he liked it.
Even better than that, when my son came home from school, he walked straight to it and loved it and wanted to pull one out and eat it.
And the ultimate test was when I brought them to my son’s Halloween party at school.
All of his classmates loved them!

Happy Halloween!
For more fun Halloween posts, click on over to:
Last Minute DIY Costume: Just in Time For Halloween
The Top 14 Best Halloween Ideas on Pinterest
Pumpkin Chunkin & How To Host Your Own Event

- Top 5 Things to Do in Frederick This Weekend - May 4, 2026
- 5 Home Accessibility Upgrades Frederick County Homes Are Installing Right Now - March 10, 2026
- How a Historic Downtown Frederick Venue Added Accessibility Without Losing Its Charm - January 31, 2026
Comments are closed.